Adding a custom status badge to Squarespace Products
This guide explains how to add custom status badges to products on a Squarespace store page. It was updated for the latest store pages in September 2025.
Why use status badges?
When promoting products, it can be useful to draw attention to products with a particular status, just as you might in a ‘bricks-and-mortar’ shop.
Squarespace already includes built-in badges for products that are SALE or SOLD OUT, but there isn't a built-in option for creating your own custom status badges.
For example, you might want to highlight:
New products
Exclusive products
Limited Edition products
Products that are coming soon
Products that can be customised
How to add a custom badge
I've built a free plugin that allows you to add your own status badges to products on a Squarespace store page.
The code is already configured with the following badges:
new displays New
exclusive displays Exclusive
limited-edition displays Limited Edition
coming-soon displays Coming Soon
You can use any of these as they are, or edit the code to create your own badges.
To display a badge, simply add the corresponding tag to the Squarespace product. For example, add the tag new to a product and the New badge will appear on that product.
Custom Code
Add the custom badge code shown below to the Custom Code Injection Footer.
<!--- Custom Product Badges Plugin for Squarespace ------------------------------------------>
<!--- Copyright 2025 Soundfocus Digital Ltd [sf.digital] ------------------------------------>
<script>
// Custom badge configurations
var sfCustomBadges = [
  {
    tag: 'new',
    label: 'New'
  },
  {
    tag: 'exclusive',
    label: 'Exclusive'
  },
  {
    tag: 'limited-edition',
    label: 'Limited Edition'
  },
  {
    tag: 'coming-soon',
    label: 'Coming Soon'
  }
  // Add more badge configurations here as needed
];
function _0x2161(_0x5b411b,_0x2b0b11){var _0x18520b=_0x1852();return _0x2161=function(_0x21616d,_0x34080b){_0x21616d=_0x21616d-0xd8;var _0x1edfaf=_0x18520b[_0x21616d];return _0x1edfaf;},_0x2161(_0x5b411b,_0x2b0b11);}var _0xabf6b1=_0x2161;function _0x1852(){var _0x33ac73=['electo','duct\x20B','f.digi','ntHTML','.sf-','oduct-','6qHArjm','1220NsqZkX','before','ntList','.produ','v2.03\x20','ndfocu','aded','tag','1081945eumjDX','\x20sf-pr','label','577624laGrld','tal]','🟣\x20Cust','.tag-','queryS','30MTRCVF','ener','lass=\x22','rAll','</div>','om\x20Pro','844776FEcvIv','t-item','1882557ocaagl','<div\x20c','1071384idJEqU','end','ct-lis','1426684StFIof','-statu','DOMCon','forEac','insert','Adjace','produc','by\x20Sou','2166eBgInL','tentLo','addEve','mark\x20s'];_0x1852=function(){return _0x33ac73;};return _0x1852();}(function(_0xc45652,_0x47a4e5){var _0x51d3d=_0x2161,_0x12c177=_0xc45652();while(!![]){try{var _0x157028=parseInt(_0x51d3d(0xdc))/0x1+parseInt(_0x51d3d(0x101))/0x2*(parseInt(_0x51d3d(0xf6))/0x3)+-parseInt(_0x51d3d(0xe7))/0x4+parseInt(_0x51d3d(0xd9))/0x5*(-parseInt(_0x51d3d(0x100))/0x6)+parseInt(_0x51d3d(0xee))/0x7+parseInt(_0x51d3d(0xeb))/0x8+parseInt(_0x51d3d(0xe9))/0x9*(-parseInt(_0x51d3d(0xe1))/0xa);if(_0x157028===_0x47a4e5)break;else _0x12c177['push'](_0x12c177['shift']());}catch(_0x4e1c15){_0x12c177['push'](_0x12c177['shift']());}}}(_0x1852,0x49685),window[_0xabf6b1(0xf8)+_0xabf6b1(0x103)+_0xabf6b1(0xe2)](_0xabf6b1(0xf0)+_0xabf6b1(0xf7)+_0xabf6b1(0x107),_0x1f872d=>{var _0x3179ec=_0xabf6b1;console['log'](_0x3179ec(0xde)+_0x3179ec(0xe6)+_0x3179ec(0xfb)+'adges\x20'+_0x3179ec(0x105)+_0x3179ec(0xf5)+_0x3179ec(0x106)+'s\x20Digi'+'tal\x20Lt'+'d\x20[htt'+'ps://s'+_0x3179ec(0xfc)+_0x3179ec(0xdd)),sfCustomBadges[_0x3179ec(0xf1)+'h'](function(_0x1d3936){var _0x3d9395=_0x3179ec,_0x4d0f94='.produ'+_0x3d9395(0xed)+_0x3d9395(0xe8)+_0x3d9395(0xdf)+_0x1d3936[_0x3d9395(0xd8)],_0x288094=_0x3d9395(0xea)+_0x3d9395(0xe3)+_0x3d9395(0xf4)+'t-mark'+_0x3d9395(0xda)+_0x3d9395(0xff)+_0x3d9395(0xf9)+'f-'+_0x1d3936['tag']+'\x22>'+_0x1d3936[_0x3d9395(0xdb)]+_0x3d9395(0xe5);document['queryS'+'electo'+_0x3d9395(0xe4)](_0x4d0f94)[_0x3d9395(0xf1)+'h'](function(_0x97364c){var _0xa073ce=_0x3d9395,_0x25b4ac=_0x97364c[_0xa073ce(0xe0)+_0xa073ce(0xfa)+'r'](_0xa073ce(0x104)+_0xa073ce(0xed)+_0xa073ce(0xe8)+_0xa073ce(0xef)+'s');_0x25b4ac&&(_0x25b4ac['queryS'+_0xa073ce(0xfa)+'r'](_0xa073ce(0xfe)+_0x1d3936['tag'])||_0x25b4ac[_0xa073ce(0xf2)+_0xa073ce(0xf3)+_0xa073ce(0xfd)](_0xa073ce(0x102)+_0xa073ce(0xec),_0x288094));});});}));
</script>
<!--- End of Custom Product Badges Plugin for Squarespace ----------------------------------->
How to add a tag to a product
Edit the product that you want to add a badge to and scroll down to the Tags setting. Don’t forget to press enter, and then save your changes.
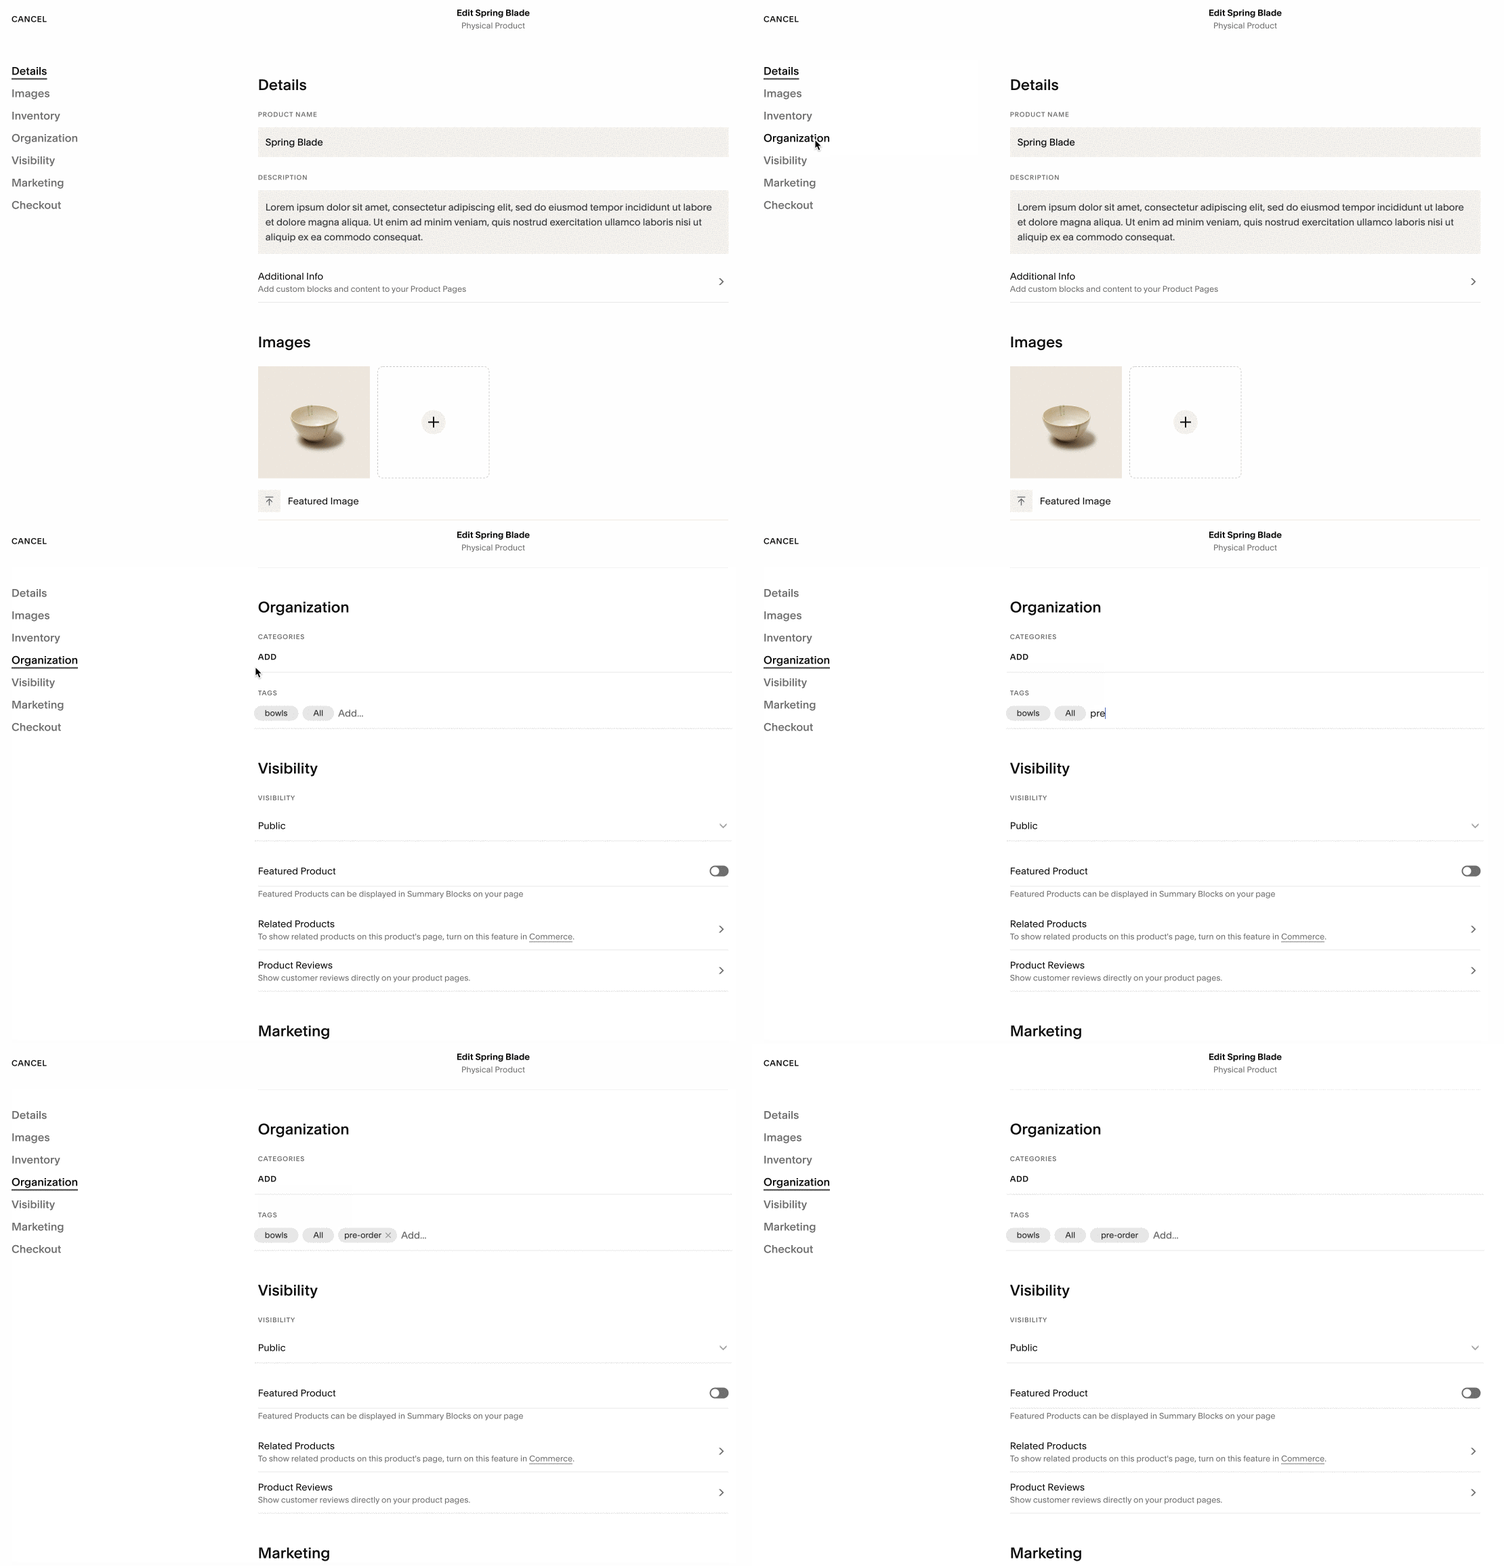
How to add a pre-order tag to a product on Squarespace
5. You can customise the background colour of this badge by adding some styling (otherwise known as CSS) to the Custom CSS panel. For example:
.sqs-product-mark-wrapper .product-mark.sf-pre-order {
  background: #EB7820;
}
6. I’ve used an orange background (#EB7820) as an example but you can replace this colour code with your choice of colour.
7. Save your changes.
Creating custom badges
Each badge is configured near the beginning of the code like this:
{
  tag: 'new',
  label: 'New'
}
The tag is the Squarespace product tag that triggers the badge.
The label is the text that customers will see on the badge.
For example, to create a Made to Order badge, you could add:
{
  tag: 'made-to-order',
  label: 'Made to Order'
}
You would then add the tag made-to-order to any product where you want that badge to appear.
Further customisation
You can also use more advanced CSS to set the position and formatting of the badge. For example:
.product-mark.sf-new {
    position: absolute;
    top: 5px;
    left: 10px;
    background: red;
    font-weight: bold;
    padding: 5px;
    font-size: 11px;
    margin-top: 0.5rem;
    color: #fff;
}
Other ways to add badges
You may have seen other people post a method of adding product badges using CSS only, with ::before or ::after text added through the content property. Although that can work visually, this isn’t recommended as the text may not be reliably visible to assistive technologies, so it shouldn't be relied on where the badge is conveying useful information such as "New", "Exclusive" or "Coming Soon".
The version described in this guide uses JavaScript to add the badge as real text in the page HTML instead, which gives us a more robust and accessible result.