Squarespace Forms and GDPR
If your business is based in the European Union (EU), or you process the personal data of EU citizens, the General Data Protection Regulation (GDPR) affects you. Since 25 May 2018, you must only communicate with contacts who have expressly opted-in to your marketing. Neither soft opt-in nor soft opt-out approaches are allowed.
In this article, I'll explain how you can make a new Squarespace Form GDPR-compliant.
What has changed?
The GDPR says you must obtain freely given, specific, informed, and unambiguous consent from your contacts. You also must clearly explain how you plan to use their personal data and who you will share it with. You'll need to include checkboxes for opt-in consent, and a section that explains how and why you are using data.
If you want to use a standard Squarespace Form and connect it to MailChimp, this article will explain how to make it comply with the GDPR.
Old forms?
If you already use a form that isn't compliant, you'll need your existing contacts to opt-in to your marketing permissions again. The best way to do this is to send a Mailchimp consent campaign. Mailchimp have created an email template to help you do this. In summary:
Log on to MailChimp
Create a new email campaign.
In the Content section, click Design Email.
Click the Themes tab.
Click the drop-down menu and choose Subscriber Alerts.
Click the GDPR Subscriber Alert template.
Creating a GDPR compliant form for a newsletter
Let's cover how you add a new form to your Squarespace site to collect mailing list subscribers and how you connect this to MailChimp. if you've not done this before, you should probably read Squarespace's own guide first: Using MailChimp with Squarespace.
Add a new form to your Squarespace page. As a minimum you'll need an email address field. I've included Name and Email Address fields (see below).
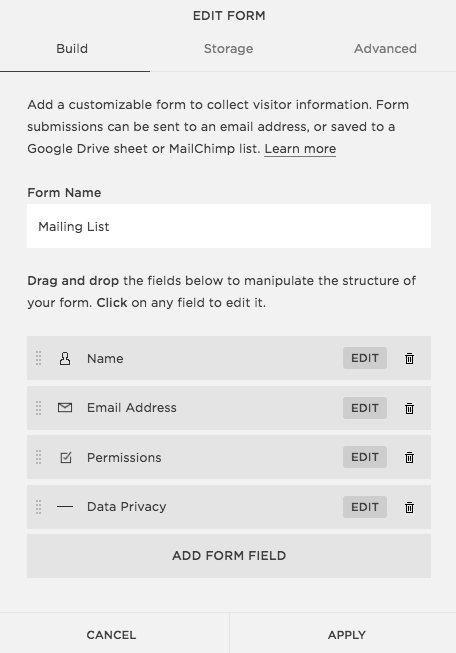
For the GDPR compliance, I've added a Checkbox field with the title Permissions.
This checkbox field will be used to get consent for our marketing activity. The GDPR says you must obtain freely given, specific, informed, and unambiguous consent. This checkbox will be used to seek their consent. If you carry out more than one marketing activity you will need to add checkboxes for each one because each marketing activity must be clearly communicated and requires separate consent.
In the Description box I've added the following description "We will use the information you provide on this form to provide you with regular updates. Please confirm you would like us to contact you by:". You might need to edit this language to fit your marketing plan, so be sure to review it carefully.
In the Options box, I've added "Email" as the only option.
Below this checkbox, we'll want to add some text to comply with two aspects of GDPR. We need to:
Make it easy for people to withdraw consent and tell them how
Explain we are sharing their data with MailChimp and let them know their policies and terms.

I've added a Line field. The line field allows you to add descriptive text. You can remove the line by unchecking the Underline option. Based on MailChimp's GDPR guide, I've added the following text:
You can change your mind at any time by clicking the unsubscribe link in the footer of any email you receive from us. We will treat your information with respect.

We use MailChimp as our email automation platform. By clicking below to submit this form you acknowledge that the information you provide will be transferred to MailChimp for processing in accordance with their <a href="https://mailchimp.com/legal/privacy/">Privacy Policy</a> and <a href="https://mailchimp.com/legal/terms/">Terms</a>.
The text includes some HTML that allows us to include links to MailChimp's current Privacy Policy and Terms. These are important elements of compliance.
Connect the form to your MailChimp account.
It's strongly recommended that you enabled double-opt in by checking the Require double opt-in after subscribing option. This extra confirmation step verifies each email address and provides additional evidence of consent.
Save the form.
Segmenting your Mailing List
The steps above build your Squarespace form, but they don't make the sign-up process compliant. After you’ve set up your permission checkbox, segment your list to make sure you send your campaign only to the people who have given consent through your signup form.
Before we logon to MailChimp, here's a quick recap of what we did on our form. We created a checkbox called Permissions with an option of Email. This means that the subscribers who agreed to receive emails will have 'Email' in the Permissions field.
Log on to MailChimp and click Lists.
Click on the List that you are using for this mailing list.

Click Create a Segment.
In the first drop-down, choose the name that you gave to your Form's checkbox. You'll recall that I named it 'Permissions'.

Then select a condition of "is Email". This is because I named the checkbox option 'Email'.

This will ensure that the segmented list only contains email addresses where the owner checked the checkbox.
Preview the Segment to see which records will be included, then save the segment.
Use the segmented list for your email campaigns.
Remember, don't add any new campaigns without seeking each user's explicit permission.